Kubernetes
Kubernetes 補充
錯誤
- Failed to allocate IP: No available IPs
因為當初在開啟 microk8s enable metallb:192.168.0.17-192.168.0.17 太少了。像是例子為只有開一個。 此時,可以先關掉 metallb,再重新開啟,並且將IP數字變多。
    microk8s disable metallb

    microk8s enable metallb:192.168.0.17-192.168.0.100
參考網址:https://discuss.kubernetes.io/t/addon-metallb/11790
知識
- 透過 MicroK8s 認識 Kubernetes 的 Service Account (服務帳戶)
-
建立別名:讓 microk8s.kubectl = kubectl
sudo snap alias microk8s.kubectl kubectl
-
如何取得 Pod 的資訊,並以 yaml 呈現。
kubectl get pod microbot -n dev -o yaml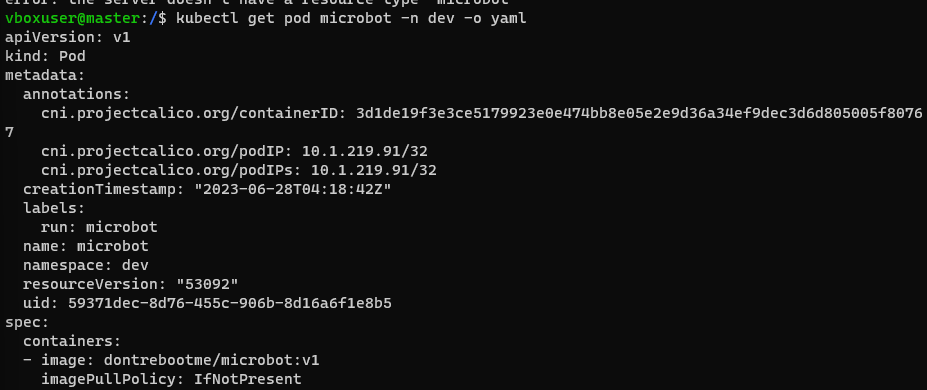
-
進入Pod的console
kubectl exec microbot -it -n dev -- sh -
RBAC
k8s 在 1.8 版之後,引用了 Role-Base Access Control (RBAC,基於角色的訪問控制,好像有點繞舌) 做為授權 (Authorization) 的基礎,也就是一種管制訪問 k8s API 的機制。管理者可以透過 rbac.authorization.k8s.io 這個 API 群組來進行動態的管理配置。引用 https://ithelp.ithome.com.tw/articles/10195944
kubectl create namespace dev kubectl label namespace dev name=dev kubectl run microbot --/assets/image=dontrebootme/microbot:v1 -n dev
kubectl create serviceaccount monitor -n dev kubectl create clusterrole aweit --verb='' --resource='' kubectl create clusterrolebinding aweit --clusterrole=aweit --serviceaccount='dev:monitor'
microk8s kubectl create token monitor
-
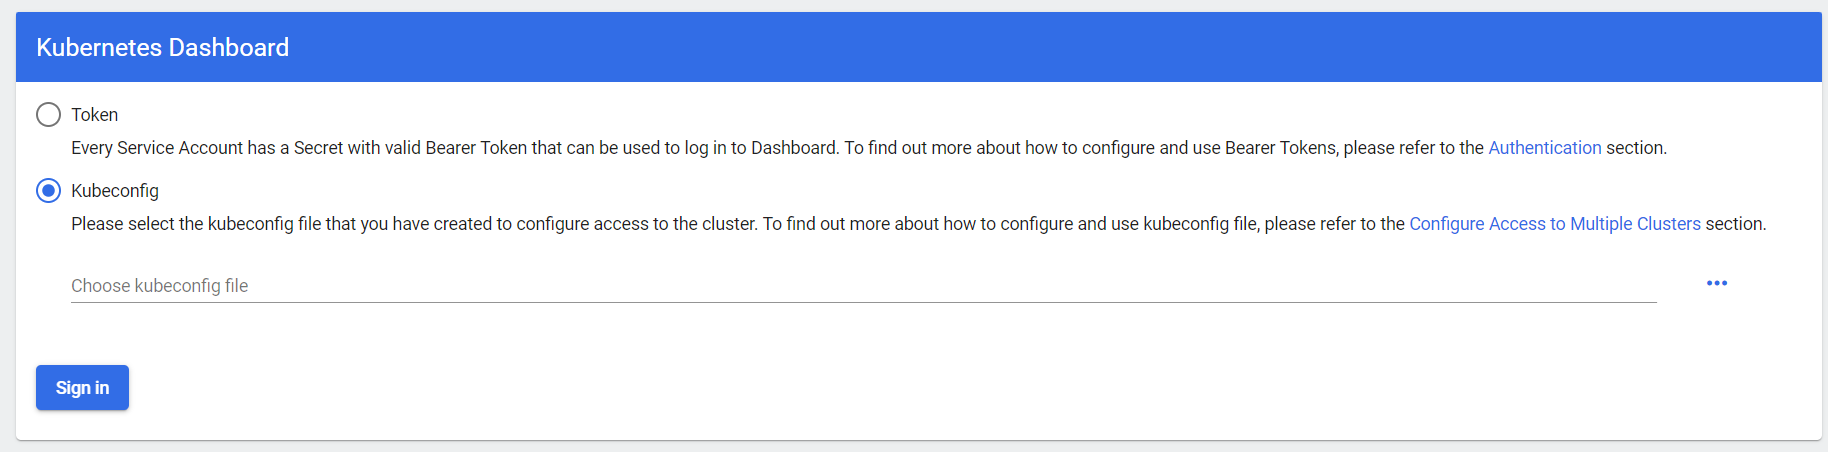
Dashboard 與 Kubeconfig
-
開啟 Dashboard
microk8s enable dashboard -
登入頁面
-
如何產生 .kueconfig
mircok8s config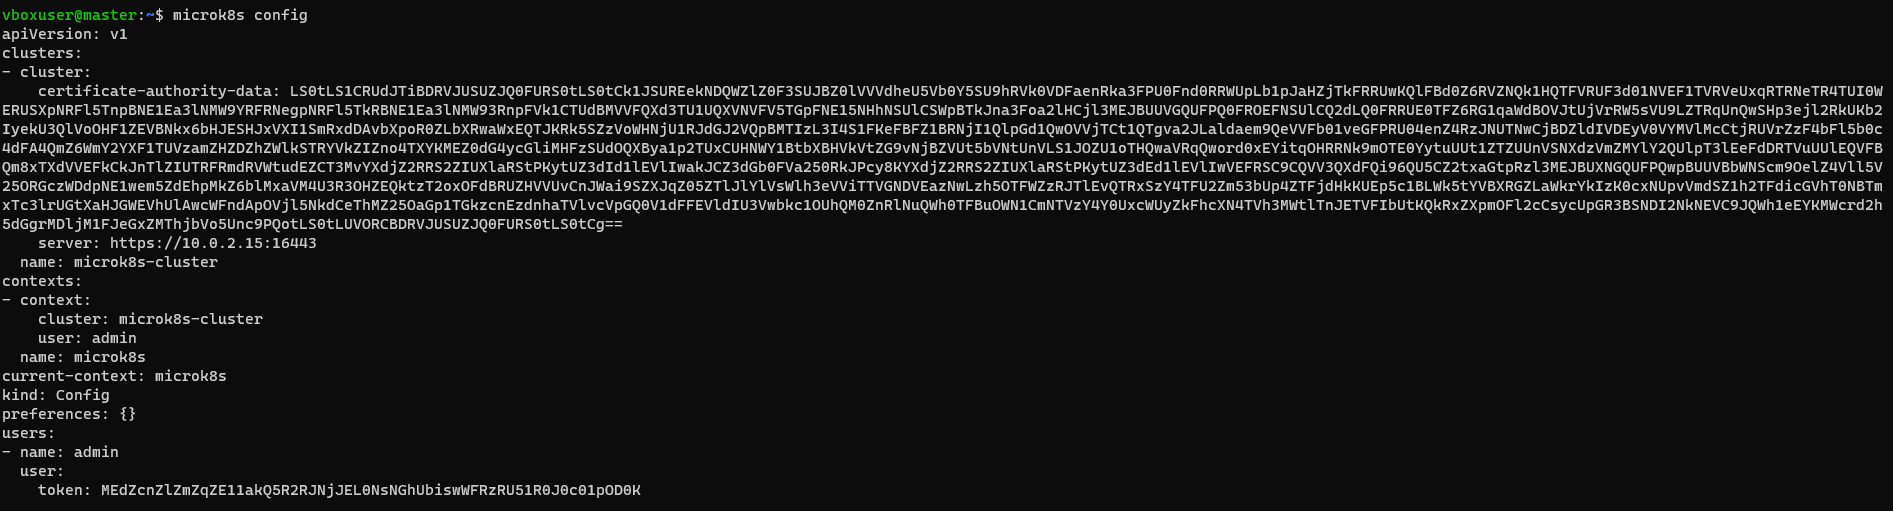
在本機建立 .kubeconfig 檔案,將上圖的文字貼上去。 -
重新上傳 .kubeconfig 檔案即可。
-
Token
microk8s kubectl create token [service account]
microk8s kubectl create token default
Volume
- Type: emptyDir、hostPath、local、nfs、persistentVolumeClaim
apiVersion: v1
  kind: Pod
  metadata:
    name: test-pd
  spec:
    containers:
    - image: registry.k8s.io/test-webserver
      name: test-container
      volumeMounts:
      - mountPath: /test-pd
        name: test-volume
    volumes:
    - name: test-volume
      hostPath:
        # 宿主上目录位置
        path: /data
        # 此字段为可选
        type: DirectoryOrCreate
-
nfs
-
[Ubuntu NFS 安裝教學] https://blog.devcloud.com.tw/ubuntu-nfs-install/
NFS Server IP: 192.168.0.17
showmount -e 192.168.0.17

如果要新增掛載目錄
  # 建立共享資料夾
  sudo mkdir /opt/nfsshare

  # 編輯 NFS Server 的 Expose 設定
  sudo nano /etc/exports
  ...
  /opt/nfsshare  192.168.0.0/24(rw,sync,no_subtree_check,no_root_squash)

  # 重啟
  sudo systemctl restart nfs-kernel-server.service

  # 顯示 Mount 資訊
  showmount -e 192.168.0.17
- PV/PVC/Pod
apiVersion: v1
kind: PersistentVolume
metadata:
  name: nfs
spec:
  capacity:
    storage: 1Mi
  accessModes:
    - ReadWriteMany
  nfs:
    server: 192.168.0.17
    path: "/opt/nfsshare"

---
apiVersion: v1
kind: PersistentVolumeClaim
metadata:
  name: nfs
spec:
  accessModes:
    - ReadOnlyMany
  storageClassName: ""
  resources:
    requests:
      storage: 1Mi
---
apiVersion: v1
kind: Pod
metadata:
  name: hwchiu
  labels:
    app: hwchiu
spec:
  containers:
  - name: busybox
    image: hwchiu/netutils:latest
    volumeMounts:
      - name: nfs-volume
        mountPath: /nfs
  volumes:
    - name: nfs-volume
      persistentVolumeClaim:
        claimName: nfs
Tomcat & Volume
# PV: 先有 nfs server,並且建立好對應的資料夾,例如:/opt/nfsshare/demo/webapps
apiVersion: v1
kind: PersistentVolume
metadata:
  name: nfs-demo-tomcat
spec:
  capacity:
    storage: 1Mi
  accessModes:
    - ReadOnlyMany
  nfs:
    server: 192.168.0.17
    path: "/opt/nfsshare/demo/webapps"

---
# PVC: 建立 PV 請求
apiVersion: v1
kind: PersistentVolumeClaim
metadata:
  name: nfs-demo-tomcat
spec:
  accessModes:
    - ReadOnlyMany
  storageClassName: ""
  resources:
    requests:
      storage: 1Mi
---
# Deployment: tomcat 鏡像,綁定 nfs 共用資料夾。
# 因為 tomcat 8 以後,會多一個 webapps.dir 資料夾,所以要執行 cp -r webapps.dist/.  webapps/ 才能將資料夾與檔案全部搬移過去。
apiVersion: apps/v1
kind: Deployment
metadata:
  name:  tomcat-deployment-nautilus
  labels:
    name: webdep
    app: demo
spec:
  replicas: 1
  selector:
    matchLabels:
      name: webpod
      app: demo
  template:
    metadata:
      name: webpod
      labels:
        name: webpod
        app: demo
    spec:
      containers:
        - name: tomcat-container-nautilus
          image: tomcat
          ports:
            - containerPort: 8080
          volumeMounts:
            - name: nfs-volume
              mountPath: /usr/local/tomcat/webapps
      volumes:
        - name: nfs-volume
          persistentVolumeClaim:
            claimName: nfs-demo-tomcat

---
# Service
apiVersion: v1
kind: Service
metadata:
  name: tomcat-service-nautilus
spec:
  selector:
    name: webpod
    app: demo
  ports:
    - port: 80
      targetPort: 8080


---
# IngressRoute
apiVersion: traefik.io/v1alpha1
kind: IngressRoute
metadata:
  name: tomcat-ingress-route
  namespace: default
spec:
  entryPoints:
    - websecure
  routes:
    - kind: Rule
      match: Host(`localhost.mic.com.tw`) && PathPrefix(`/tomcat`)
      middlewares:
        - name: test-stripprefix
        - name: test-errors
      services:
        - name: tomcat-service-nautilus
          port: 80
  tls:
    secretName: mic-tls
把 webapps.dist 目錄下的所有檔案,複製到 webapps 底下
cp -r webapps.dist/. webapps/
traefik: 把 /tomcat 去掉
# Middleware
apiVersion: traefik.io/v1alpha1
kind: Middleware
metadata:
  name: test-stripprefix
spec:
  stripPrefix:
    prefixes:
      - /tomcat
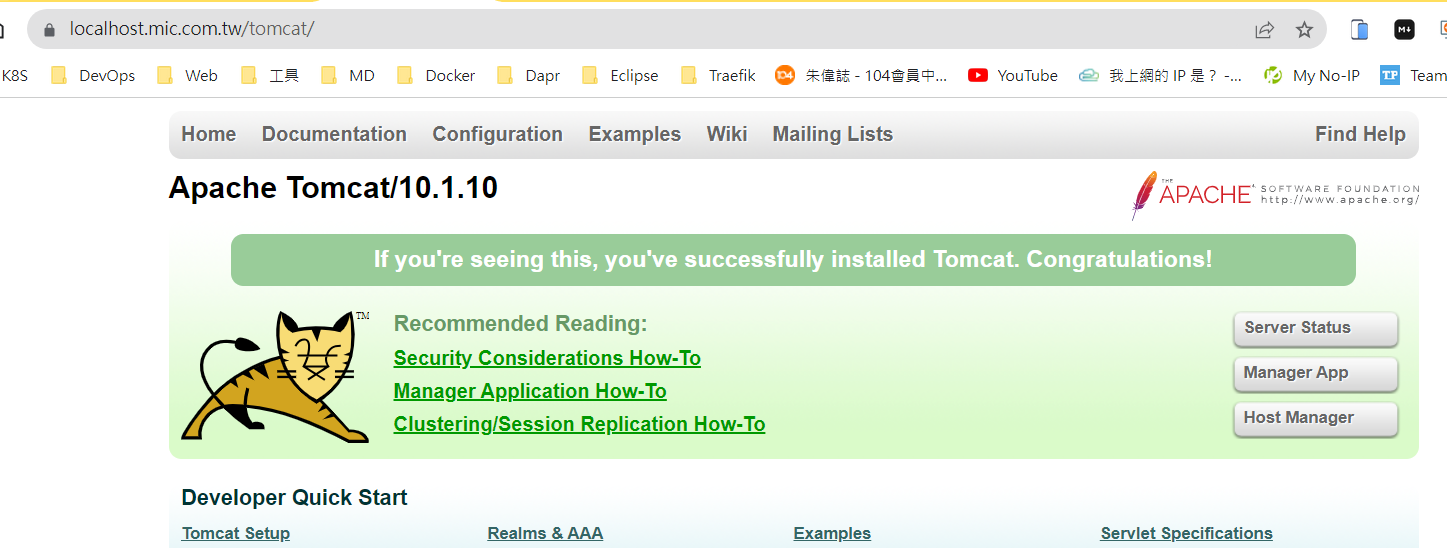
https://localhost.mic.com.tw/tomcat/
Namespace 狀態為 Terminal 時,如何刪掉?
kubectl delete namespace  longhorn-system

kubectl get ns/longhorn-system -o json > longhorn-system.json
nano longhorn-system.json -> 清除
"spec": {
        "finalizers": [
            "kubernetes"
        ]
    }
->
"spec": {
        "finalizers": []
    }
kubectl replace --raw "/api/v1/namespaces/longhorn-system/finalize" -f ./longhorn-system.json